


Aim for about 10 to 20 minutes per icing session, with 20 minutes commonly recommended as a maximum for most areas of the body. Ice works best during the first few days after an acute injury, and it’s most effective (and safest) when you always place a thin barrier, like a damp cloth, between the ice and your skin. Keep reading for the “why” behind this timing, plus guidance on when it’s time to stop icing and move on.
TL;DR:
- Most clinicians recommend icing for 10 to 20 minutes per session, with 20 minutes as the maximum for most body areas to avoid skin damage.
- Icing provides short-term pain relief and reduces perceived swelling but does not speed up tissue healing or reduce inflammation beyond symptom management.
- Proper technique, including wrapping ice in a damp cloth and monitoring skin, is essential to prevent frostbite or cold burns, especially on bony or sensitive areas.
- Icing frequency during the first days should typically follow the 20/40 rule, with sessions repeated every 1 to 3 hours, depending on injury location and patient sensitivity.
- Once swelling subsides, pain is manageable without ice, and skin sensation returns to normal, it is time to transition to active recovery rather than continue icing.
Table of Contents
- How Long to Ice a Knee (Or Any Joint) and Why It Works
- How Do You Ice Safely Without Risking Skin Damage?
- How Often Should You Ice an Injury?
- When Should You Stop Icing and Start Moving Again?
- Heat or Ice: Which One Fits Your Injury Right Now?
- What Does Over-Icing or a Cold Burn Look Like?
- Why Soft-Gel, Conforming Wraps Make Safer Icing Easier
- A Note From Cool Relief on Icing and Getting Back to Moving
- Which Cool Relief Wrap Fits Your Icing Routine?
- Sources
- FAQ
How Long to Ice a Knee (Or Any Joint) and Why It Works
Ice doesn’t heal an injury. It calms it down. Cold therapy slows nerve signaling at the skin’s surface, which dulls pain and reduces how swollen an area feels, even though it does little to speed up what’s happening underneath at the tissue level. That distinction shapes almost everything else in this guide.
A critical review of cryotherapy research found that icing is mostly a symptom-control tool. There’s limited human evidence that it actually accelerates tissue repair, a point echoed in broader peer-reviewed literature on cryotherapy mechanisms. That’s a real shift from the old assumption that ice “reduces inflammation” in a way that speeds healing.
Here’s what icing does reliably support:
- Short-term pain relief, especially in the first day or two
- A reduced sensation of swelling and tightness
- Comfort that makes early movement more tolerable
This is exactly why clinical guidance has moved away from the old RICE model (Rest, Ice, Compression, Elevation) toward frameworks like PEACE & LOVE, which favor early, controlled movement over long stretches of passive rest and icing, according to Cleveland Clinic’s guidance on soft tissue recovery.
How Do You Ice Safely Without Risking Skin Damage?
Technique matters as much as timing. A poorly applied ice pack can leave you with a cold burn even if you stay within the time limit.
- Wrap the ice pack in a thin, slightly damp cloth or towel. Never place ice or a gel pack directly on bare skin.
- Position the injured area with slight elevation when possible, and add gentle compression if a wrap allows it without cutting off circulation.
- Choose a pack shape that actually fits the body part. A soft-gel wrap that molds to a knee or shoulder cools more evenly than a rigid pack that only touches a few high points of contact.
- Check the skin partway through the session. If it’s bright pink but not painfully numb, you’re likely fine to continue for the remaining minutes.
- Remove the pack at your time limit even if it still feels comfortable. Numbness can mask the early signs of overexposure.
People with diabetes, peripheral neuropathy, poor circulation, or vascular disease should exercise extra caution, since reduced sensation can hide the early warning signs of cold injury before real damage sets in.
Pro Tip: If you’re icing an area with thinner skin or less padding, like an ankle bone or wrist, monitor it closely and consider shorter intervals, since bony, low-fat areas cool faster and can reach risky temperatures sooner than padded areas.
How Often Should You Ice an Injury?
Most clinical sources land in the same range: 10 to 20 minutes per application, with 20 minutes widely cited as the practical maximum for most body areas. Going longer does not provide additional pain relief and increases risk.
The 20/40 rule: A common interval pattern used by sports medicine and physical therapy providers is about 20 minutes of icing followed by around 40 to 60 minutes off, allowing skin temperature to normalize before the next round, per interval guidance from Franciscan Health.
Beyond that basic rhythm, a few adjustments matter depending on who’s icing and where:
- Small or bony joints (fingers, wrists, ankles) often require shorter sessions, sometimes about 10 minutes, repeated more frequently rather than one long stretch.
- Children and older adults often have thinner skin or less subcutaneous fat, making shorter durations with closer monitoring safer.
- Larger muscle groups (thighs, hips, shoulders) may generally tolerate up to 20 minutes.
- Typical frequency for acute injuries may involve icing every 1 to 3 hours during the initial days, adjusted by pain and swelling.
Clinicians sometimes shift this pattern for specific cases, favoring more frequent, shorter bursts over one long session when a patient has sensitive skin, limited feeling, or a smaller injury site.
When Should You Stop Icing and Start Moving Again?
Icing is most beneficial during the first few days after an acute injury; some clinicians may recommend continuing slightly longer depending on swelling and pain trends. After that, it’s usually time to shift the plan.
- Pain is manageable without ice. If discomfort is tolerable between sessions, you likely don’t need the same frequency anymore.
- Swelling is trending down, even if stiffness remains. Reduced swelling with lingering stiffness is a sign to introduce gentle range-of-motion work.
- Skin sensation is fully normal between sessions. No lingering numbness or discoloration means your tissue has recovered from each application.
- Symptoms persist past a few days. If pain, swelling, or limited motion aren’t improving, that’s a cue to see a physical therapist rather than keep icing indefinitely.
Heat or Ice: Which One Fits Your Injury Right Now?
Ice and heat aren’t interchangeable, and using the wrong one at the wrong stage can slow you down. Ice suits active swelling and fresh injuries. Heat suits stiffness once the acute inflammatory phase has passed.
- Use ice for fresh sprains, strains, swelling, or post-surgical inflammation in the first 24 to 48 hours.
- Use heat for chronic muscle tightness, stiffness without active swelling, or to loosen tissue before activity.
- Avoid applying heat to a joint or muscle that’s still visibly swollen or warm to the touch, since it can worsen inflammation.
- If you alternate the two, wait until swelling has clearly settled before introducing heat, and never do it in the same session back to back.
The old “always ice it” advice doesn’t hold up well anymore. Modern frameworks treat ice as one short-term tool among several, not a blanket first response for every ache.
What Does Over-Icing or a Cold Burn Look Like?
Frostbite and cold burns from at-home icing are uncommon but entirely preventable once you know the warning signs.
Stop icing immediately if you notice any of the following:
- Skin turning white, waxy, or blotchy instead of pink
- Severe or worsening numbness that doesn’t fade quickly after removal
- Blistering or a burning sensation during or after application
- Pain that increases rather than decreases as you ice
If any of these show up, remove the barrier, rewarm the area gradually with a dry towel, and avoid rubbing the skin. Persistent numbness, blistering, or skin color that doesn’t return to normal warrants a call to a medical provider. People with diabetes, neuropathy, or vascular disease face higher risk since reduced sensation can delay noticing these signs in the first place.
Why Soft-Gel, Conforming Wraps Make Safer Icing Easier
A rigid ice pack that only touches part of a knee or shoulder forces you to keep repositioning it, and that inconsistency is exactly what can lead to uneven cooling or accidental overexposure in one spot. Soft-gel wraps solve that by molding to the joint’s actual shape.
- Even, consistent coverage reduces the chance of concentrated cold in one small area.
- A snug, conforming fit helps a barrier stay in place for the full session instead of sliding off.
- Refreezable gel packs support the interval pattern clinicians recommend without needing a fresh ice source every time.
This kind of fit doesn’t replace good technique. It just makes the technique easier to follow consistently, session after session.
A Note From Cool Relief on Icing and Getting Back to Moving
Cold therapy wraps should support your recovery, not complicate it. Icing has a real, useful job in the first day or two after an injury, but it works best paired with a barrier, a timer, and a plan to start moving again once swelling settles. If pain or stiffness lingers past a few days, talk to a clinician instead of reaching for the ice pack indefinitely. Our pain relief guides walk through more of these specifics for common injury types.
— Cool Relief
Which Cool Relief Wrap Fits Your Icing Routine?
Once you know the timing and technique, the right wrap helps make consistent icing easier. Soft-gel technology provides even, conforming coverage as described in this guide.
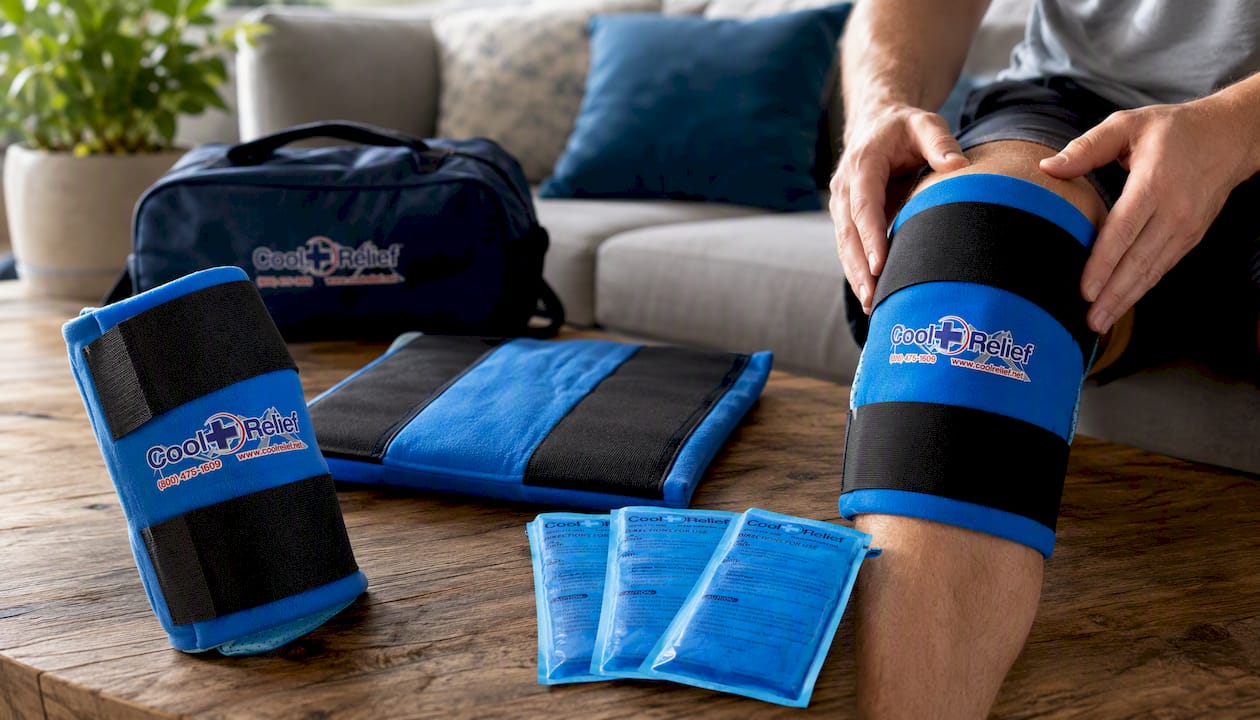
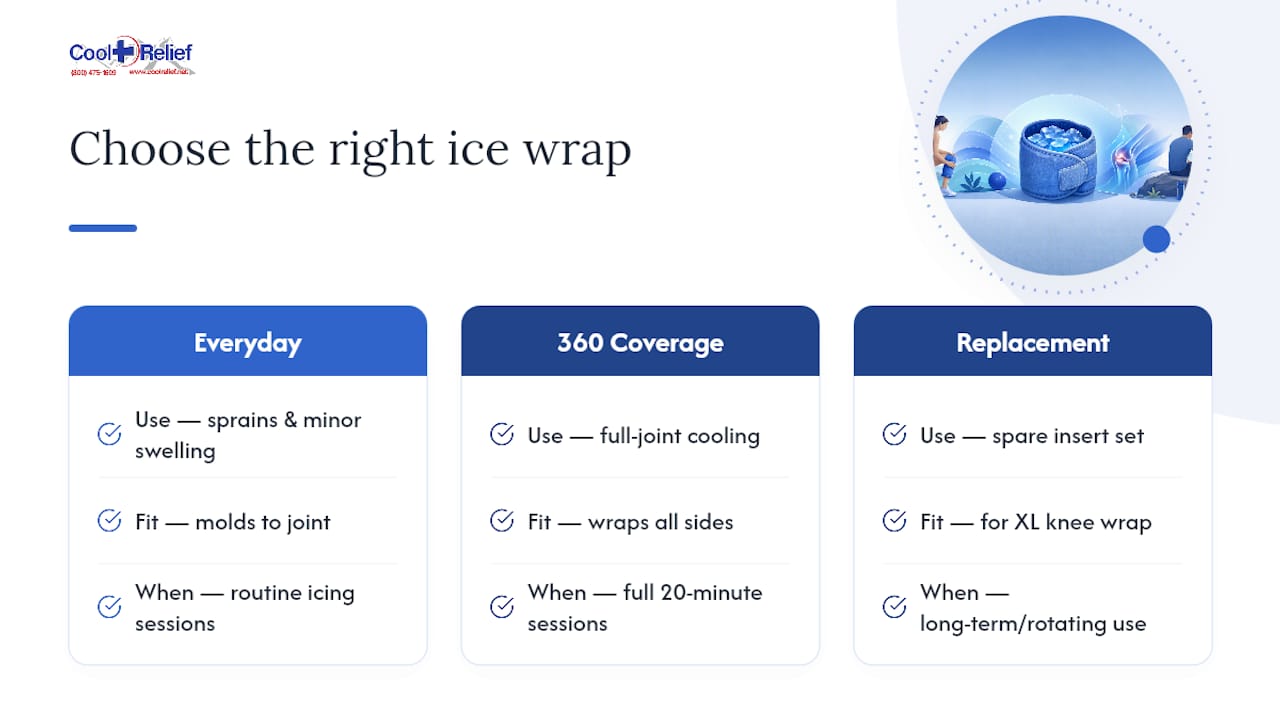
The Knee Ice Pack Soft Gel is a solid everyday pick for sprains, minor swelling, or recovery after knee surgery, molding to the joint instead of sitting flat against it. If you need coverage on all sides, the Large Soft Gel Pack for Knee 360 Coverage wraps the entire joint at once, which helps keep cooling even during a full 20-minute session instead of concentrated on one edge. And if you’re planning to ice regularly over weeks of recovery, the Replacement Gel Ice Pack Insert Set for XL Knee Wrap lets you keep a wrap in rotation without buying a whole new unit.
Pairing consistent cold therapy with active recovery steps, like the loading-based rehab approaches used at partner clinics such as OsteoStrong, or complementary options like compression therapy, rounds out a safer, more complete recovery plan. Ready to find your fit? Browse the full lineup of ice wraps and pick the one that matches your injury and routine.
This article is general information, not a substitute for advice from a qualified doctor. Consult a qualified healthcare professional about your own circumstances before acting on anything here.
Sources
- How Long Should You Ice an Injury?
- PubMed: critical review on cryotherapy (reference)
- PMC review article (archive)
- Cleveland Clinic guidance on bone contusion and recovery
FAQ
Should You Ice for 15 or 20 Minutes?
Either works. Most clinical guidance supports a 10 to 20 minute range, with 20 minutes as the practical ceiling for most areas of the body.
Why Is Ice No Longer Always Recommended for Injuries?
Because research shows icing mainly manages pain and swelling perception rather than speeding tissue repair, clinical frameworks now favor early controlled movement alongside short-term icing instead of prolonged rest and ice alone.
How Long Are You Supposed to Ice at a Time?
Stick to 10 to 20 minutes per session, then let the skin fully return to normal temperature, typically 40 to 60 minutes, before icing again.
Is It Okay to Ice for 30 Minutes?
No. Going past 20 minutes raises the risk of cold burn or frostbite without adding meaningful pain relief, so it’s best to stop at the recommended window even if the area still feels sore.
How Long to Ice After Surgery?
Post-surgical icing generally follows the same 10 to 20 minute guideline, repeated every 1 to 3 hours during the first 24 to 48 hours, unless your surgeon gives you a different schedule.
Share and get 15% off!
Simply share this product on one of the following social networks and you will unlock 15% off!